|

 | |
Sink and Rise In Your Turns
Moving up and down through
the turn sequence is a key part of making it to the next level. Many new
telemark skiers, especially those coming from the alpine end (for some
unexplained reason) will sink into the first turn and stay there. They
will then just shuffle their feet through the lead changes, often iniating
the new turn in parallel mode.
I have found a way to
overcome this and get the up down motion we are looking for. As you make
the lead change, pause for a moment at the point where the skis are
parallel and the tips even with each other. When you do this it is almost
impossible to not be standing tall at the very end on the turn, ready to
sink into the next turn. In order to maintain that tips even position for
a second or so you will find that you are all the way up!
You don't want to have to
continue this pause in your transition forever, after all, the goal in
tele-turning is to make smooth even turns, but if you think that you are
not rising up through the turn, try it. You just may find that it is the
key to getting the turn sequence straight.
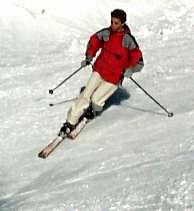
Telemark Stance
|
Take
a look at your basic telemark stance: hands forward and in view, hips
back over the rear ski, back knee tucked in behind the front knee, and
upper body upright, not hunched over. If your hips are back over your
rear ski and you are able to relax your ankle to get the ball of the
foot onto the ski, then you will find it easy to get that equal weight
distribution (front and back ski) that is essential to good tele skiing.
.Try
a very low drop stance and a higher stance and find a stance in between
that works for you. Check out the Feature Story on this site "The Best
Way To Telemark" for more on old school (very low drop) and new school
telemark approaches. |
 |
Moving From Wedge Turns to Parallel
Turns
|
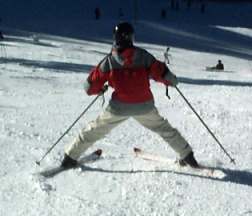
Here is an
exercise guaranteed to get you making parallel turns from the wedge
turn. In the photo, Neil is beginning a wedge to the right (notice the
snow behind his pressured left ski). He is going to make a wedge turn to
the right and then to the left, making quick, short wedge turns
downhill, after a few of these turns he will begin to bring his skis
closer to parallel with each turn. After ten or so turns he will be
making parallels! This exercise works great because it uses the energy
built up from the wedge turns to get the parallels started, just
remember to bring the skis a bit closer to parallel with each wedge
turn. For more on wedge turns and wedge to telemark turns, read on. |
 |
The Cornerstone: Wedge Turns
Wedge turns are the cornerstone of
the foundation of good fundamental skiing. Many people, even top notch
experienced skiers, confuse wedge turns and snowplows. Snowplows are a
static, locked in kind of stance, very handy for stopping in crowded
areas, speed control in not to steep places and survival situations such
as when pulling a toboggan or skiing difficult snow with a heavy pack. The
wedge turn is a completely different animal, parallel turns are direct
descendants of the wedge and the wedge can be used to learn to tele-turn,
as we will see later in the lesson.
The big difference between snowplow
and wedge turns is that in the snowplow, we are mostly concerned with
slowing down and going straight. The skis are in a locked in position with
the tails pushed way out in a strong "V" position, a little turning is
possible by lightening the pressure of one of the skis, but for the most
part, real turns begin with the wedge. In the wedge turn, the "V" shape of
the skis is a bit less dramatic and is not held so long. Now that we have
that background, lets get started making wedges and wedge turns.
Find a gentle decline of a hill and
start by straight running downhill keeping the skis parallel, about 12 to
15 inches apart. Allow yourself to build up a bit of speed then force the
tails out and form a "V" with the skis, feel the pressure on the skis,
then go back to a parallel ski position, repeat. When teaching kids to ski
we give them this to visualize: make a hot dog...make a pizza (slice),
make a hot dog...make a pizza. During this exercise your ski position will
look like this (birds-eye view) :
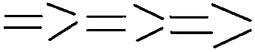
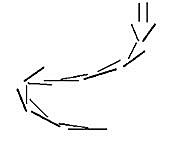
Now, I want you to think about the
pressure you felt on the skis while making the wedge, we are going to vary
that pressure one ski to the other and move the lesser pressured ski in
towards the other ski while turning. A wedge turn to the left sequence is
as follows: straight run, wedge, increase pressure on the right (outside)
ski while lessening pressure on the left (inside ski), as you begin to
turn, decrease pressure on the inside (left) ski all the way to the point
that you can bring it in to the parallel (hot dog) position. At this point
you should be close to all the way through the turn and about ready to
start your turn to the right. Again move back to the wedge, this time
pressuring the left ( new outside or uphill ) ski and reducing pressure on
the right (new inside or downhill) ski. As you feel the turn starting,
begin to reduce pressure even more on the inside ski and bring it in next
to the outside ski. In this ski position illustration the pressured ski is
the bolder one.
In the illustration you see a turn
to the right and the outside ski (left ski) is being pressured while the
inside (right ski) is being lightened, the skis come together then resume
the wedge with the new outside ski pressured (right ski) and the inside
(left ski) being lightened and brought in. Practice these wedge turns
until they are solid.
Last month I wrote about making your
first telemark turns by making garlands across the slope and then
executing the big turn. I wrote about this method first because it is how
I learned. I got the garland thing from a tape by Bela and Mimi Vadasz of
Alpine Sports International. I think it is out of print, by now it is old
and the equipment part is way outdated, but it covered the basics quite
well. Anyway, another way to get those first tele-turns under your belt is
to execute them from the wedge turn.
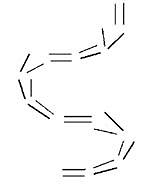
The idea is to begin the turn in the
wedge and as you begin to turn, slide the outside (pressured) ski forward
and slide the inside ski back and in towards the front ski. The tip of the
inside ski should end up right around the front of the boot of the outside
ski. The ski position illustration looks like this, (again the pressured
ski is the bold one):
This was a difficult thing to
illustrate, but I think if you study the sequence carefully you will be
able to see the straight run, the wedge beginning of the turn and the
transition to the telemark position of the skis. The equal pressure
segment in the middle is followed by the new wedge and the pressured
right (outside ski) as the turn begins to the left. The key is to make a
fairly quick transition to tele from the wedge. Try it, for some folks
it is the easiest way to successful first telemark turns! Next week I
will add a bit about wedge-to- parallel turns, so check back!
|
Getting
Started: First Turns
..I
am sure most tele skiers remember the first telemark turn they ever
made, I recall mine very well. I was with a friend on an overnight trip,
we skied to the top of San Emigdio peak here in So. California, we dug a
shelter, ate some dinner, and later that night toured out to an overlook
for an awesome view of the little mountain community we lived in, Pine
Mountain. The lights below were twinkling, the moon was shining on the
snow as it rose above the almost 9,000 ft peak of Mt. Pinos, and not a
breath of wind, perfect quiet. It was a magical backcountry moment. The
next morning, we went for a tour, it had snowed about a foot the day
before and stayed cold, the snow was good. Ed and I were resting at the
top of a little rise and we started talking about how nice it would be
to be able to turn these 215 cm, fishscale base, cross-country skis, Ed
said he had seen some people making a kind of turn called a telemark, he
stood up and said "I think its like this", he pushed off and made a
swooping arc to the left, coming to a stop next to a tree. He had a big
grin on his face and was laughing as I dropped into his track and turned
down next to him. We had survived our first tele-turns unscathed and
from that moment on we were hopelessly addicted. Every chance we got we
would ski out to the meadows on Mt. Pinos, set up a little base near a
hill and practice. It was great.
..Find
yourself a gentle slope for your first turns and try this: start
at the side of the run and traverse across the slope dropping into a
basic tele position ( see last months lesson page ) and then rising up
out of it and dropping back down again, each time turning up into the
hill slightly to slow down, then pointing the lead ski down a bit to get
the next turn going. Do not change the lead ski. These turns are called
garlands and your track should look something like this:
..When
you get to the end, stop, and do a little kick turn and try making
garlands in the other direction, making sure to drop down into the turn
and standing up tall at the end of the turn. When you get to the point
of being able to make these garlands consistently, it is time to
eliminate the kick turn and actually execute a full tele-turn back the
other way. Remember to sink into a low tele stance as you make that last
garland, hold a little more speed, stand up tall as you make the lead
change and steer that front ski around and make another series of
garlands. Repeat this exercise until you are comfortable in the tele
stance and making the turn at the end.
Now it is time to
start making linked turns: again on a gentle slope, begin with your
first turn, sinking down into the turn, begin standing up tall as you
arc around the fall line and start the lead change, turning to the left
you will have the right foot forward and as you end that turn you will
be bringing the left foot forward and starting the turn to the right,
sink down into the new turn then begin to stand up and start the lead
change, and the turn back to the left again. Remember, the stance should
be fluid up and down, never static, the up-down motion is the what makes
the lead change smooth.
..A
word about edging: as you sink down into the turn, pressure the inside
edge of your lead ski with your big toe and inside ball of the foot,
don't forget to edge the rear ski by pressuring the little toe and
outside/forward ball of the foot as well. Decrease your edging pressure,
roll the skis flat momentarily as you make the lead change, and then get
onto the new edges, all this should happen quickly, staying on your
edges is key.
..This
brings us to another point: I often see beginners holding the turn way
too long, they come too far around, the edges begin to slip as they lose
speed at the end of the turn, the hands come up, desperately searching
for balance, finally, if they don't fall, they start another turn. Do
not make this mistake. I often tell these people to cut the turn down by
half, get going back the other way and onto those edges quickly and you
will remain much more stable and in control. If you can just keep from
holding the telemark turn too long, you will cut the learning curve
dramatically.
this not
this not
this
Your track should
look like the one on the left, if it looks like the one on the right,
you are holding your turns too long, start your new turn sooner
..Try
the garlands across the slope, make your first full
.turns at the end of
the series, concentrate on the up/down motion, edging, and keeping your
turns from getting too drawn out and I am sure that your first turns
will be both memorable and productive in the quest to learn to
telemark. Have fun!
|
|