|

 | |
Telemark Lessons
Closing Up The Telemark Stance
"Parallel Knees"
To take
full advantage of today's beefy boots and powerful skis many of us are
looking for ways to close up our tele stance. We want to stay more
centered over the skis and get more shin pressure on the lead ski
boot-tongue. This is hard to do in a spread out tele position.
For many
years conventional teaching techniques have taught us to tuck that back
knee in behind the lead ski knee. To really tighten things
up I am going to suggest that you depart from that old saw and try
keeping your knees parallel to each other instead. This is
yet another another idea suggested to me by one of my ski partners.
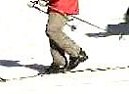
Keep your
knees up next to each other, as in parallel skiing, and make your lead
changes with out letting your rear ski knee drift back at all. Try to
keep the inside of your knees touching as a reminder, you can get back
to a more independent leg action later but for now keep 'em touching.
Your back leg and knee will drift back a bit naturally but by
concentrating on keeping your knees parallel it won't be much.
Try this technique and
see if it helps get you centered and in a more powerful stance. Feel the
added shin pressure with less effort and without bending over at the
waist to get it. I think this may be a break-through tip for many of us.
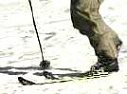
Shin pressure on the
tongue of the lead ski boot is a key factor in keeping the ski carving
and avoiding washout. It takes just a slight correction in stance to get
more pressure on the boot tongue when your knees are parallel.
Experiment with this: get in a midway tele stance with the knees
parallel as above, now adjust your weight forward and backward to see
just how a very subtle shift in position can increase this shin
pressure. It is an enlightening exercise!
Quick Hit: Roll The Knees Early
Roll your knees and
point them in the direction of the new turn and you will set up the
carve sooner and not have to steer your skis so much. This will lead to
a slower, more rounded and controlled turn. Getting your skis on edge
faster is the key here and pointing your knees, both the lead and the
back knee, into the turn will work wonders for you.
Remember to keep the
back knee tucked in close behind the front knee or try the newer
technique above.
Make your lead change
and in one, smooth motion pressure the inside edges and roll your knees
into the turn and you will find yourself on top of the turn sequence!
Another Quick Hit:
To get more weight on
the rear ski try this: bring the back ski up a bit and let your ankle
bend so that the heel is not so high up off the ski. This will result in
more pressure on the ball of the foot of the back ski! In some snow
conditions this becomes really important. In powder, crud and all kinds
of lesser snow it is absolutely mandatory that you increase the weight
on the rear ski. Try this hint to get more pressure on the back foot and
keep that ski from wandering out of the carve and causing you all kinds
of grief.
Still Another Quick Hit: Keep
Moving!
..One
of the really important things I can pass along to you is this: keep
yourself in motion! By this I mean up/down, tall/small motion. Sink into
the turn and rise up into the start of the next turn.
..I
have found that this up/down motion is not only important in the
initiation of the turn but also keeps the tele skier from making a whole
host of other mistakes. One of the big mistakes I see being made by a
lot of alpine converts is a bit of hesitation during the lead change.
During this hesitation I see them initiating in parallel and then
dropping into a tele stance, it is not a pretty sight. Usually they are
in a very rigid tele stance to start with and I see very little up/down
through the turn sequence.
..If
you focus on sinking into the turn and rising up (standing tall) for the
start of the new turn you will give yourself something to concentrate on
and you will be much more fluid and dynamic through the turn sequence.
This fluidity should keep you from developing a "hitch" in the turn, and
result in a purer tele turn. Remember: don't lock up, stay in motion.
Smooth Telemark Turns
..Many of us made
our first telemark turns on steeper (above green level) terrain by using
a kind of step turn. It is a sequential turn initiation, the front ski
is moved forward and "stepped" across the fall line, edged, and then the
rear ski is brought around and edged as well. A two step process. The
reason that we fall into this two step turn is that the speed (and the
associated "fear factor") is controlled immediately. The skis are
brought around across the fall line quickly, in fact the lead ski is
close to across the fall line at the start of the turn. This step
turn is great for keeping the speed down and for use in tough snow
conditions, a good reason to refine and perfect it later. The step turn
is not a very elegant way to ski though and can be put away in the back
of the turn quiver most of the time. To smooth out our turns we need to
look at edging both skis at the same time and making one fluid
single-move initiation.
..The
goal of this lesson is to get you making a carving turn, one that does
not have the wedge-step-skidding action as described above. If you have
been skiing steeper terrain, knock it back a notch and hit an easier
slope for the first part of this exercise.
..Start
by making your turns with this in mind: slide the rear ski back and
begin by edging this ski first. Get your weight on the ski, relax your
ankle, and press your little toe and ball of your foot hard onto the
edge. Let the front ski fall into place, don't worry about edging it,
you will automatically, concentrate on the back ski. Continue making
turns and with each turn try to connect the edging sequence of the two
skis closer together, make sure though that you are edging the rear ski
first, closing the gap towards a simultaneous initiation from this
direction rather then from the front to back ski approach.
Edging the rear ski first will
assure that you are engaging this ski at all times, unlike the step turn
in which the rear ski is treated almost like an afterthought. To make
smooth turns you want to use both of those skis on your feet, keeping
them equally in the act and carving rather then skidding.
Once you feel that you are
edging both skis in one movement try this: aggressively turn the rear
ski, concentrate on turning the ski in the new direction,
again let the front ski follow the lead of the back ski, it will.
Turning the back ski in tele position feels much different then turning
the front ski with your foot flat on the ski. With your heel up off the
ski you have to twist your foot a bit to tighten the turn up.
After you get the ski on edge, press down with the little toe and the
ball of your foot and apply a bit of twist to the ski. This move should
get the back ski carving sooner and the front ski, will follow. It is
almost impossible to get so much weight and emphasis on the rear ski
that the front ski becomes a problem, but make sure you edge it and keep
it carving as well.
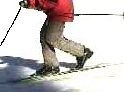
At this point, look to balance
things out somewhat but remember to be active with the rear ski. You
should be seeing your skis become more parallel to each other and far
less "wedgie". Your transitions should smooth out. The simultaneous
initiation should lead to a carved, rounded turn. Concentrate on making
these rounded turns even, symmetrical. Also, in all this rush to try new
things, don't forget the fundamentals, good hand position, facing down
the slope (see below), etc.
To sum up, slide the rear ski back, edge both
skis at the same time, actively turn (steer) the back ski, carve
your skis through the arc of the turn and repeat. As for your old step
turn, don't forget about it, it will come in handy as an advanced turn
for tight spots and bummer snow.
|
Upper Body Position: Facing Down the
Mountain
...An
important part of the progression in learning to ski well is to become
the kind of skier that attacks the mountain, the kind of skier who
imposes his or her will on the slope, not the other way around. A huge
step for a skier is the day she discovers that she can dictate
the terms of the descent down the mountain, turning when and where she
wants to turn.
...The
upper body largely determines how you ski down the mountain, if your
shoulders follow your feet around in the turn, you will look like, and
you will be, a timid skier. We can cure this the same way we work
through all ski problems: step back, head down to a gentle slope and try
some exercises. Going back down to the green runs at a resort, or
setting up a base at the bottom of a gentle backcountry hill and working
on fundamentals is something all skiers should take the time to
do occasionally. I learned this from an expert tele friend one day at
Mammoth, many years ago. We ditched our poles with the lift op at the
bottom of a run called Sesame Street, and went to work on on the basics
for a couple of runs, later in the day I found I was skiing better, even
though I was tired, not the way it usually goes. It was a good lesson
for an intermediate skier: just because you can ski steep runs
all day doesn't mean that you should, you may just be holding
yourself back.
...OK,
back to the lesson. As I wrote on the Everybody Page, disconnecting the
upper body from the lower body is key, you must be facing down the fall
line to attack the run. There are many ways to visualize this, one of my
favorites is this: when you are standing at the top of that green, or
easy blue run, look down to the bottom and see the people there, what,
you don't see 'em, well ok pretend, these people need to see the sign
you have on your chest, they need to see it the whole way down, don't
cheat these folks, let them see that sign at all times, let your feet
turn but not your upper body. Keep your hands out front and down, if
your hands are too high they will block the sign and the people won't
see it even if you are facing them. Concentrate on facing the people,
feel the disconnect, and you are on your way.
...Paul
Parker writes in his excellent book Freeheel Skiing, to visualize
a string running from the bottom of the hill straight up to the top and
through your navel and out your back (and you thought my idea was
weird), drawing you down the hill. Another way I have heard is to
pretend you have a headlight on your chest and you have to keep the
beams focused ahead and down on the slope to see where you are going
(its dark).
...Whatever
way you choose to do it, try one or all of these ideas, and remember,
stopping down and heading to an easy slope is a great way to break
through intermediate ruts.
|
|